Replacing headlight bulbs in your 2008 Buick LaCrosse is an essential maintenance task to ensure safe driving at night and in poor visibility conditions. This guide outlines the necessary steps, tips, and precautions to help you easily replace your headlight bulbs at home.
Understanding Your Buick LaCrosse Headlights
The 2008 Buick LaCrosse typically uses halogen bulbs for its headlights. These bulbs are available in various wattages and types, so it’s essential to check your owner’s manual to identify the correct specifications before purchasing replacements. Usually, they require a bulb type 9006 for low beams and 9005 for high beams.
Knowing whether your vehicle has standard or projector headlights is also crucial, as the replacement procedure can vary slightly. Let’s break down the steps involved in replacing the headlight bulbs.
Preparing for the Replacement
Before you start the replacement process, it’s important to gather all necessary materials. You’ll need new bulbs, gloves (to avoid touching the glass of the bulbs), a flathead screwdriver, and potentially a socket wrench or pliers.
Firstly, ensure that your vehicle is parked on a level surface and turned off, with the keys removed from the ignition. It’s also advisable to give the headlights some time to cool down if they have been in use, as old bulbs can get very hot.
Accessing the Headlight Assembly
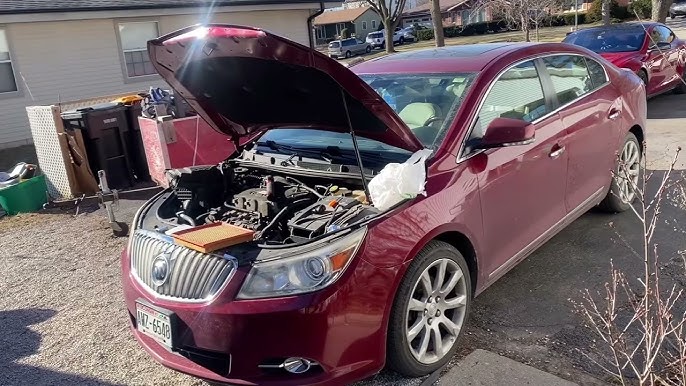
To replace the headlight bulb in your 2008 Buick LaCrosse, you will need to access the headlight assembly. Start by opening the hood and supporting it with the prop rod.
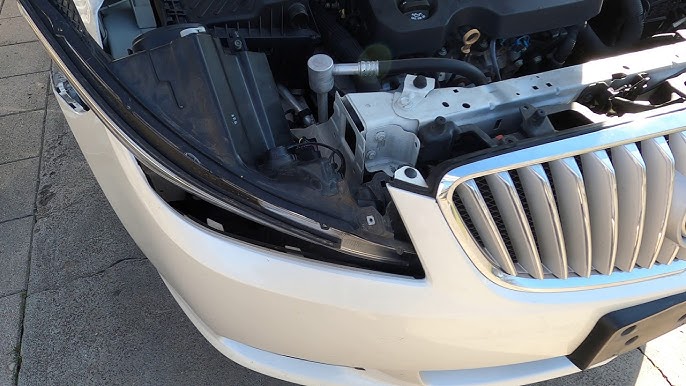
Locate the headlight assembly, which is typically situated at the front of the engine bay. Depending on which bulb you plan to change, you may need to remove the plastic cover or unfasten some screws. If you’re replacing the low beam bulb, you can often access it directly from the engine bay.
Removing the Old Bulb
Once you have located the correct bulb, disconnect the electrical connector from the back of the bulb. You can do this by carefully pulling it away from the bulb. If it’s stuck, you may need to gently wiggle it but take care not to damage the wires.
Next, you’ll need to remove the bulb itself from the socket. This usually involves twisting the bulb counterclockwise. Some bulbs have retaining clips that must be unfastened before you can pull out the bulb. Make sure to handle the old bulb carefully, as it may shatter or break.
Installing the New Bulb
With the old bulb removed, it’s time to install the new one. Always wear gloves during installation to prevent oils from your skin from getting on the bulb, as this can cause the bulb to burn out prematurely.
Begin by carefully inserting the new bulb into the socket. Make sure it is seated correctly and securely. If there are retaining clips, fasten them back in place to hold the bulb securely. Finally, reattach the electrical connector to the bulb. Make sure it’s snug and that you hear a click when it connects.
Testing the Headlights
Before putting everything back together, it’s wise to test the new bulb. Turn on the car and switch on the headlights to see if the new bulb lights up. If it doesn’t, double-check all connections, and ensure the bulb is properly seated in the socket.
If all is well, you can close the hood and put away your tools. Congratulations! You’ve successfully replaced your headlight bulb.
Tips for Long-Lasting Bulbs
To ensure that your new headlight bulbs last as long as possible, consider a few best practices. Always handle bulbs with gloves, as the natural oils from your skin can burn onto the glass and reduce bulb lifespan.
Keep your headlights clean to maximize visibility and ensure even light distribution. Regular washing of the clear covers can help maintain brightness and clarity, which is especially important during night driving or in adverse weather conditions.
Conclusion
Replacing headlight bulbs in a 2008 Buick LaCrosse is a straightforward task that can be accomplished with minimal tools and effort. By following the outlined steps and adhering to safety precautions, you can ensure your headlights are in top condition, enhancing your visibility and safety on the road.
Regular maintenance of your vehicle includes checking and replacing worn-out bulbs, and understanding how to perform this task can save you time and money. Whether you choose to do this yourself or have it completed by a professional, keeping your headlights functioning properly is crucial for safe driving. With this guide, you now have the information you need to take on this project confidently.
FAQs
1. How often should I replace my headlight bulbs?
It’s generally recommended to replace headlight bulbs every 12-24 months, but this can vary based on usage and driving conditions. Check your headlights regularly for dimming or signs of burnout.
2. Can I replace one headlight bulb and not the other?
While you can replace just one bulb, it’s advisable to replace both at the same time. This ensures even brightness and prevents future trips to the mechanic shortly after replacing a bulb.
3. What tools do I need to replace headlight bulbs?
Typically, you only need gloves, a flathead screwdriver, and possibly a socket wrench or pliers. These tools help prevent accidental damage to the electrical components during the replacement process.
4. Where can I purchase replacement headlight bulbs?
Replacement bulbs can be found at auto parts stores, online retailers, or even in some large supermarkets. Always ensure you purchase the correct bulb type for your vehicle model.
5. What should I do if my new bulb doesn’t work?
If your new bulb doesn’t work after installation, double-check all electrical connections and ensure the bulb is properly seated in its socket. If problems persist, you may need a professional to check for electrical issues or a faulty socket.